
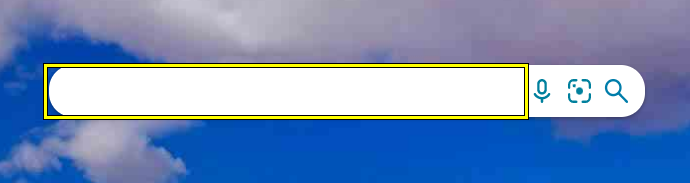
A locator is a method to recognize and locate elements on a web page or desktop application.
0. Overview #
Correctly identifying the GUI element on a webpage is crucial for creating successful automation scripts. Locators play a key role in this process.
Locators are a fundamental component of Clicknium’s infrastructure. They serve the crucial role of enabling Clicknium scripts to uniquely identify UI elements (such as text box, button, etc.). The ability to obtain a locator for a specific UI element is a critical aspect of the automation framework.
Before using Clicknium, you must first acquire some essential web knowledge, such as XPath and CSS selectors. Clicknium provides the Clicknium Recorder to aid in locating elements by simply clicking on them.
1. Locators support operations #
Locators are an essential part of automated testing. They support various operations to help users manage their locators with ease.
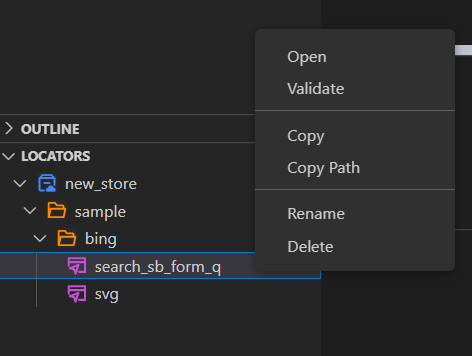
These operations include:
- Open: This operation opens the details of the locator in the VS Code edit window.
- Validate: This operation confirms that the locator is valid and can be used in tests.
- Copy: This operation creates a copy of the same locator under the same directory.
- Copy Path: This operation copies the path of the locator to the clipboard, which enables users to directly paste it into their Python code.
- Rename: This operation allows users to rename the locator.
- Delete: This operation deletes the locator.
- Actions: This operation allows users to quickly perform actions such as click, set_text, and get_text in the locator details window.
- Recapture: This operation allows users to recapture the locator in the locator details window if needed.
2. 📍How to use (Important) #
How can we retrieve the locators’ values and use them in the automation framework?
(1)Get a locator #
Clicknium provides Clicknium Recorder to get UI locators.
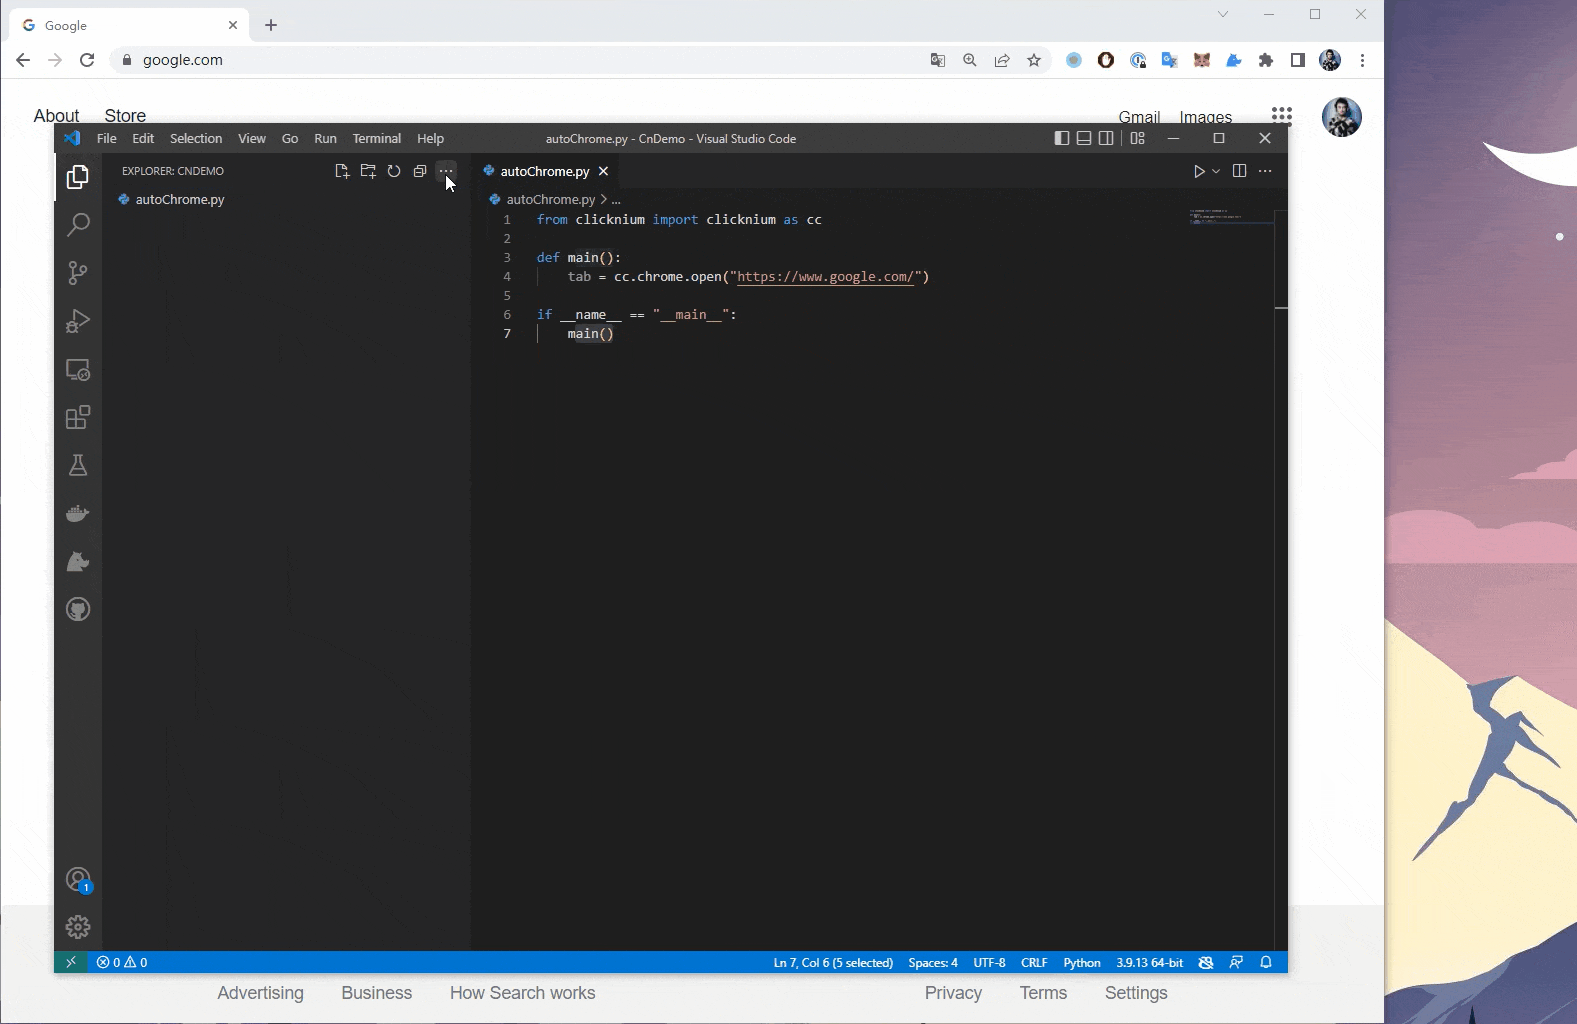
- Make sure that Clicknium Python package, VS code extention, Chrome extension is installed.
- Open a Python file in VS code.
- Capture locators with Clicknium Recorder (
Ctrl + Click).
(2)Choose Locator Type #
Most scenarios can be satisfied with the default setting(Auto mode). The capture technology and advanced options can be changed to meet your needs. Supported Capture Technoloy:
- Auto Detect: auto detect and choose a capture technoloy.
- Web Browser
- Chrome
- Edge
- Firefox
- UIA
- IA
- Java
- SAP
- Image(Computer Version)
For web browser, XPath is supported. You can change Advance Option to XPath.
For Desktop application, making a decision is simple. If you want to automat a Java or SAP application, select the corresponding technology. Otherwise, Auto Detect would use UIA as default for Windows desktop applications. Try IA if UIA doesn’t work in your case. If there is no unique attribute and hard to identity the UI element by tuning attribute, try image automation.
If you need to caputre multiple UI elements in one locator, use capture similar elements.
(3)Use Locator in Python #
Clicknium provides intellgent auto-complete experience. You can find the exsiting locators captured by Clicknium Recorder in VS Code. Select the locator class under the Clicknium package and reference Locator by Locator.{localorStoreName}.{folderName}.{LocatorName} Operate locators via Python code, run and waiting for a miracle.
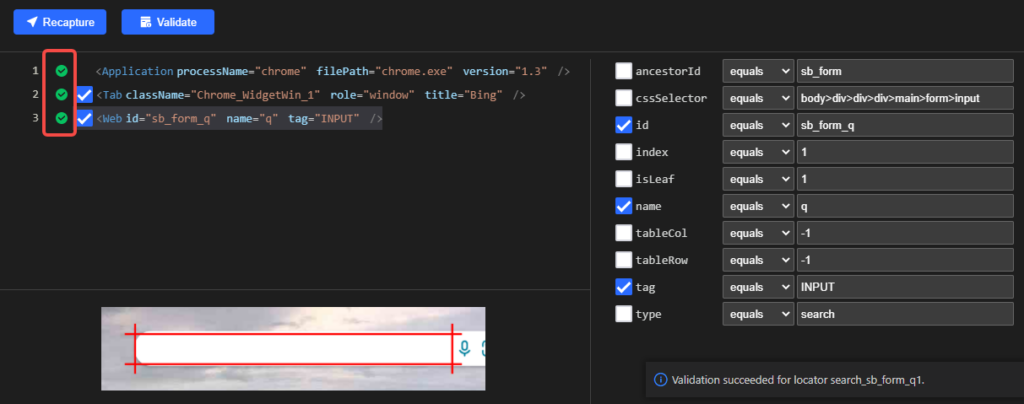
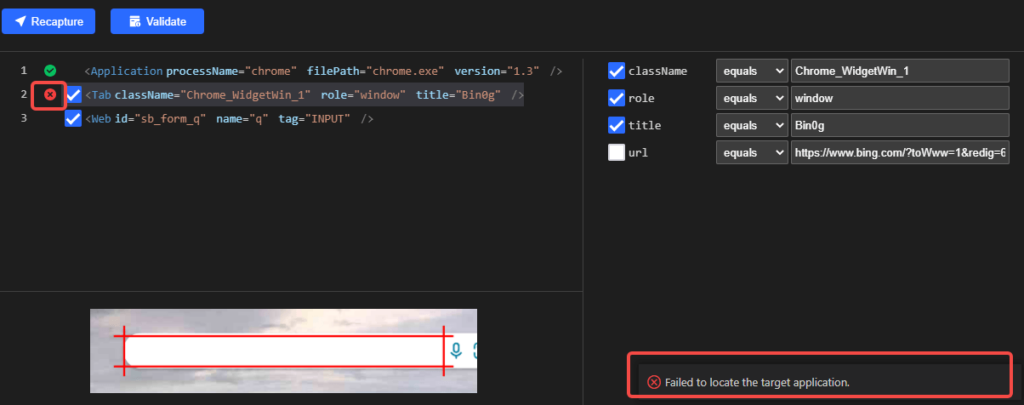
(4)Locator Editor #
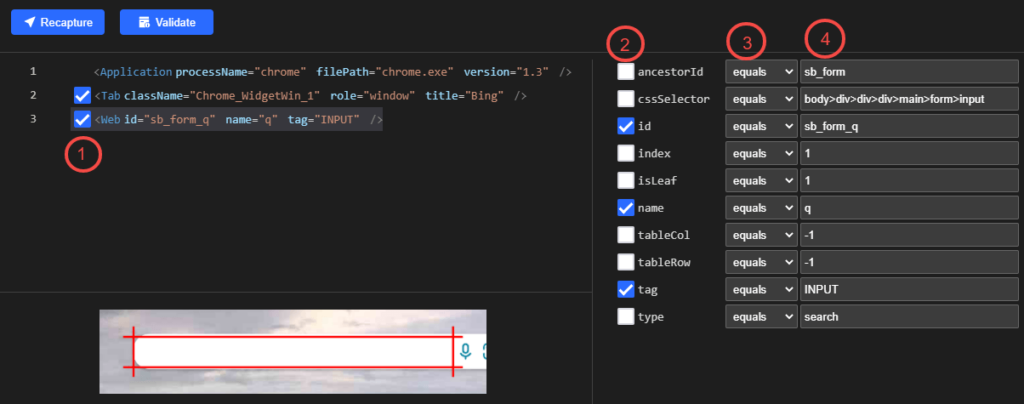
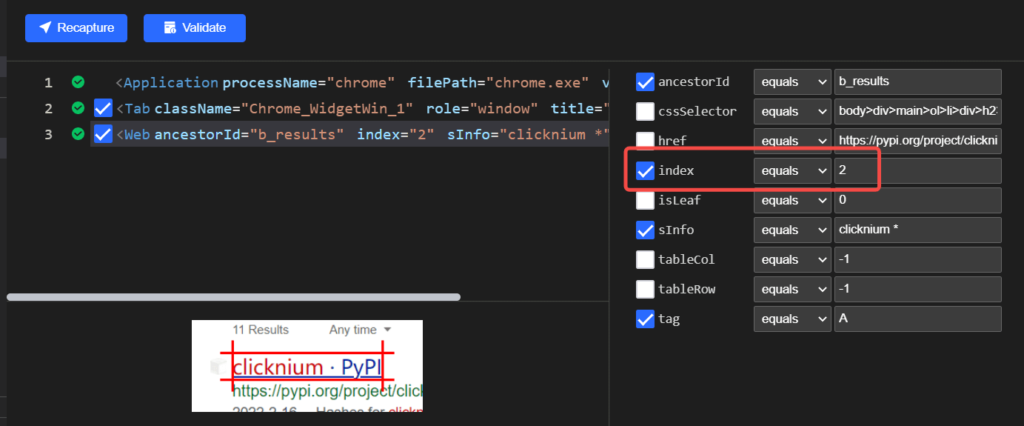
The locator editor’s detailed page is organized into two parts. The left section displays the locator tiers as an XML-based view, while the right section displays the attribute details for the selected XML node on the left. You can use the following options to select and customize the locator properties:
- Checkbox ①: Select the locator tier. The unchecked tier will be ignored when locating the UI element.
- Checkbox ②: Select the properties for the selected locator tier. The unselected properties will be ignored when locating the UI element.
- Dropdown ③: Choose from 4 matching operators: “equals”, “contains”, “startWith”, and “endWith”.
- Input field ④: Enter the value of the property.
* Note :that when the matching rule is “equals”, the value supports wildcard characters. The following wildcard characters can be used:
‘*’ : Substitute one or more characters
‘?’ : Substitute a single character
(5)Make locator robust #
To ensure the locator is robust, follow these steps:
- Uncheck the attributes that do not affect the identity of UI elements and do not have generalization.
- Use parameters as explained in the Parametric Locatordocumentation.
- Use a wildcard in the locator as explained in the Wildcard locator documentation.
- For the attributes that support regex, use the appropriate capture technology to implement it.
(6)Recapture #
- Click the
Recapturebutton to open the recorder and capture the locator again. - Capture the corresponding target UI element.
- When recording succeeds, return to VScode and save the newly recorded element by pressing ‘Ctrl+S’.
(7)Locator Validation #
Please click the `Validate` button to initiate the Locator Validation process.
a. Validation succeeded
- The recorder will automatically open a window containing the locator and highlight the corresponding element.
2. Within a few seconds, it will return to the VS Code window and mark the target element as verified.
- If the recorder fails to locate the target element, it will return to the VS Code window and indicate which locator tier could not be found.
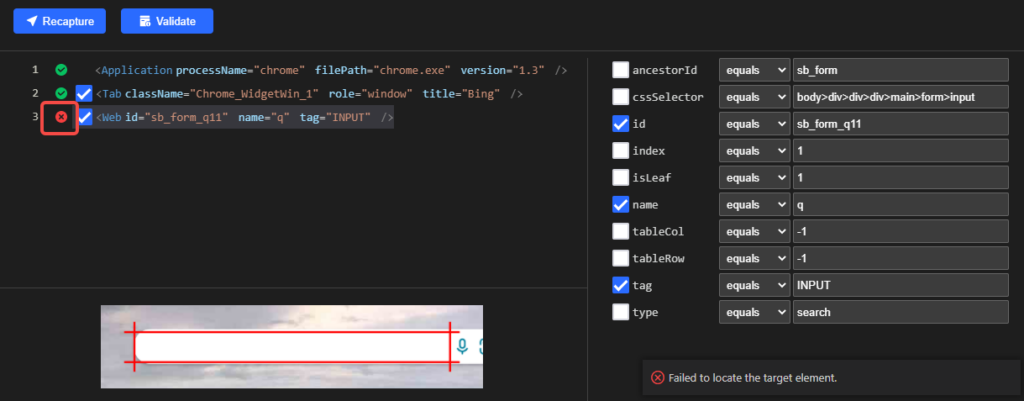
- Note: The application will not be launched, and the corresponding URL will not be entered during the verification. If the error is marked in layer one or layer two, please ensure that the application and URL are opened.
c. Multiple Windows Exist During Validation
- If multiple windows are open at the same time and contain the locator, a dialog box will pop up, allowing you to select the desired window.
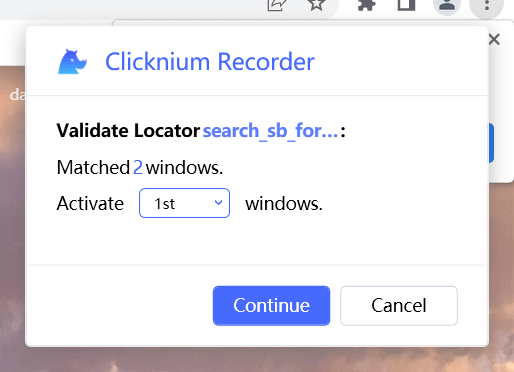
- After selecting the appropriate window, the validation process will take a few seconds before returning to the VS Code window.
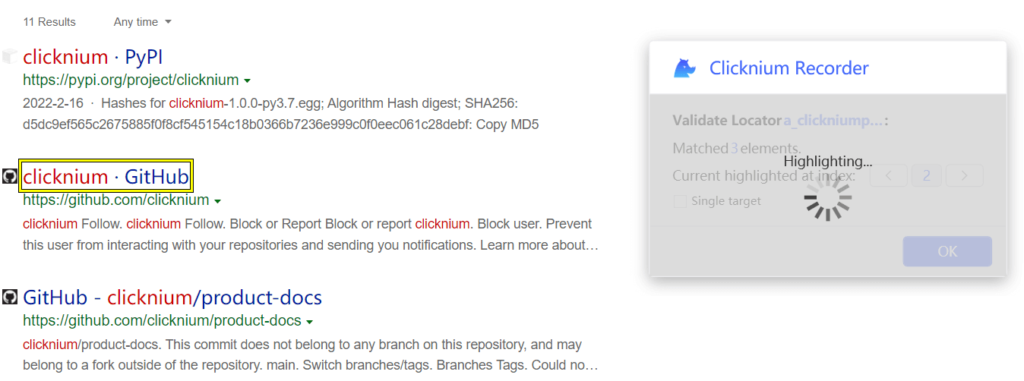
d. Multiple elements are located in validation
- If multiple locators are matched in the window, a window will pop up for you to select the locator index.
- If you switch the Index, the corresponding locator is highlighted.
If you want to update the switched Index in a locator, check and click .Single target 'OK'
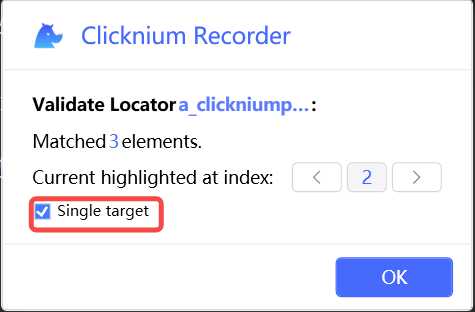
After switching back to VS Code, the corresponding Index property will be updated to the last Index and checked.
(8) Locator Error Hint #
a. Error Type
- The UI or find_element function argument must be a locator. If it is a store or a folder, an error message will be displayed.
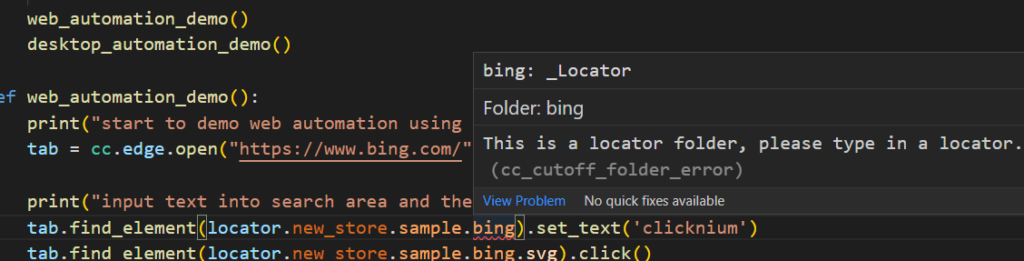
b. Locator Does Not Exsit
- If the entered locator does not exist in the referenced store, an error message is displayed.
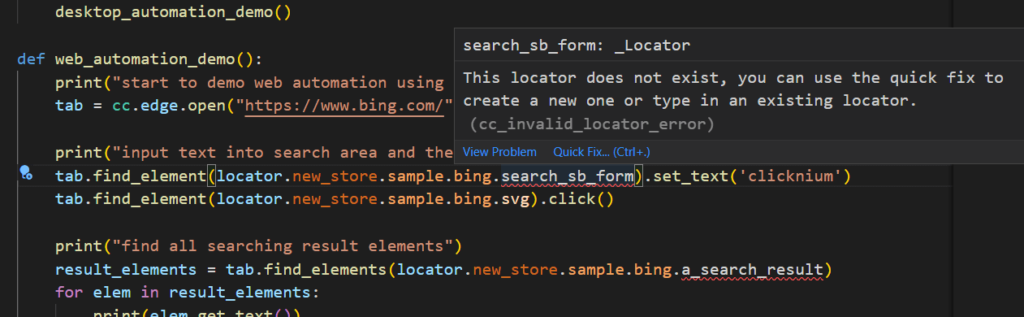
- Select
Quick Fixto start the recorder. After recording elements, a locator that does not exist will be named to generate a locator.
c. Locator Hover
- If you hover the mouse to the locator in the code, the locator content is displayed for easy identification.
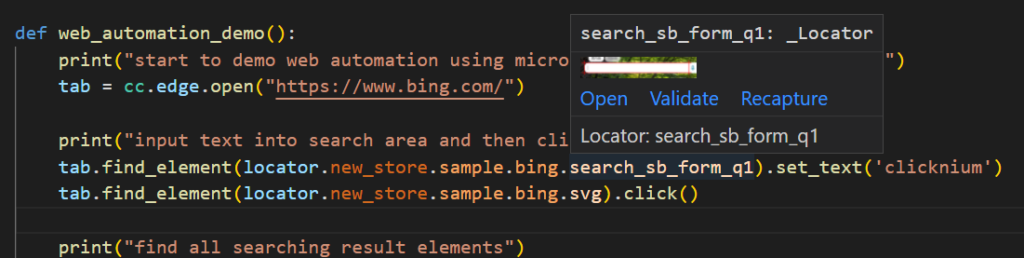
Open: Open the corresponding locator to editValidate: Validate the locatorRecapture: Start the recorder to capture the locator again. If the recorded locator is different from the one in the editing window, it will be saved directly.
(9)Auto Fill into Code #
- To start recording, you can either press the shortcut key ‘CTRL+F10’ or click on
'in the right menu.Capture' - Once you’re finished recording, choose a locator that needs to be filled in the recorder.
- Then you could click ‘
OK‘, the locator will automatically be filled into the code.
3. Advanced Locator #
Kindly review the concept related to the locator.


