Overview
This is a sample of customer onboarding solution with clicknium web automation.
For one enterprise, customer onboarding has a significant impact on a customer willingness of using your product. You may define the customer onboarding process in your company internally,for example, new customer information adds into CRM(customer relationship management) system. If you can automatically process customer onboarding, the efficiency will be significantly improved. Here we demonstrate one customer onboarding automation solution.
- load the missing customer information from CSV file.
- open CRM system.
- iterate the records in CVS file to register customer information into CRM.
Practice Walkthrough
Run this sample
- follow Clicknium getting started to set up develop environment.
- clone sample repo.
git clone https://github.com/clicknium/clicknium-samples.git- open the folder ‘CustomerOnboarding’ in Visual Studio code
- through“
pipinstall” the dependent packages
requests is used to download the CSV file and pandas is used to read CSV file.
pip install requests
pip install pandas- open
app.pyin Visual Studio Code. - press
F5to debug the sample or pressCTRL+F5to run sample.
You will see the result as below:

The Purpose of the Sample
- open the testing CRM web portal.
- get the url of CSV.
- download the CSV file.
tab = cc.edge.open("https://developer.automationanywhere.com/challenges/automationanywherelabs-customeronboarding.html")
url = tab.find_element(locator.customeronboarding.developer.a_downloadcsv).get_property("href")
excelFile = requests.get(url)
temp_file = os.path.join(os.getcwd(), 'missing.csv')
open(temp_file, 'wb').write(excelFile.content)
data = pd.read_csv(temp_file)- iterate the records in CVS file to register customer information into CRM.
for idx, item in data.iterrows():
tab.find_element(locator.customeronboarding.developer.text_customername).set_text(item[0])
tab.find_element(locator.customeronboarding.developer.text_customerid).set_text(item[1])
tab.find_element(locator.customeronboarding.developer.text_primarycontact).set_text(item[2])
tab.find_element(locator.customeronboarding.developer.text_street).set_text(item[3])
tab.find_element(locator.customeronboarding.developer.text_city).set_text(item[4])
tab.find_element(locator.customeronboarding.developer.select_state).select_item(item[5])
tab.find_element(locator.customeronboarding.developer.text_zip).set_text("%05d" % item[6])
tab.find_element(locator.customeronboarding.developer.email_email).set_text(item[7])
if item[8] == "YES":
    tab.find_element(locator.customeronboarding.developer.radio_activediscountyes).set_checkbox()
else:
    tab.find_element(locator.customeronboarding.developer.radio_activediscountno).set_checkbox()

if item[9] == "YES":
    nda = 'check'
else:
    nda = 'uncheck'
tab.find_element(locator.customeronboarding.developer.checkbox_nda).set_checkbox(check_type=nda)
tab.find_element(locator.customeronboarding.developer.button_submit_button).click()
In the code above, you can see:
- The locator is separated from code, so the locator store can be managed independently. If the CRM system is upgraded, the locator will be changed as well and the locator store is updated accordingly.
- Easy to select options from dropdown list:
tab.find_element(<locator>).select_item(<option>) - Easy to check radio button/checkbox:
tab.find_element(<locator>).set_checkbox()
Locator
The Locator is the identifier of a UI element, which can be recorded and edited in clicknium vs code extension.
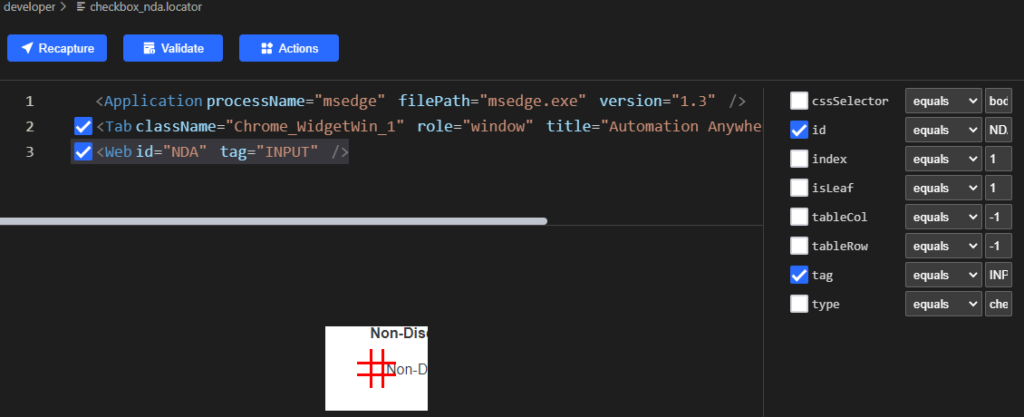
In this sample, you can open the locator in Visual Studio Code, for example:

Clicknium will automatically select the attribute to identify web element, and show all attributes of this element. It is easy to choose other attributes in Visual Studio Code as well as you want.
Comparison with Selenium
- You have to download the web driver in Selenium with the version matching exactly the browser. In this example, the Edge browser version is
103.0.1264.62, so there is a need to download the same version, MS Edge web driver first. - Selenium does not support checking operations with radio button, by click instead.
driver.find_element('id', 'activeDiscountYes').click()- Need to import additional class to wrapper to select options from the dropdown list.
from selenium.webdriver.support.select import Select
Select(driver.find_element('id', 'state')).select_by_value(item[5])
Different running time In this sample, 7 records need to be filled, with each record submit 10 fields. From the log, we can see Clicknium is running faster than selenium.
[clicknium] Start to fill data:2022-07-21 16:10:15.938903
[clicknium] End to fill data:2022-07-21 16:10:18.460162

[selenium] Start to fill data:2022-07-21 15:08:30.528693
[selenium] End to fill data:2022-07-21 15:08:37.517574
More samples
You can refer to more automation samples/solutions in clicknium github samples.
Send email to us or Join Slack.


